The iDroo whiteboard toolbar is your command center for creating, editing, and managing your ideas.
Whiteboard Toolbar
Basic controls
- Logo: Click the iDroo logo to quickly navigate back to the dashboard.
- Undo / Redo: Reverse or restore actions as needed. Ctrl + Z to undo, Ctrl + Y or Ctrl + Shift + Z to redo.
- Snapping Toggle: Enable or disable snapping for precise alignment of shapes and objects. Use Alt + S as a shortcut.
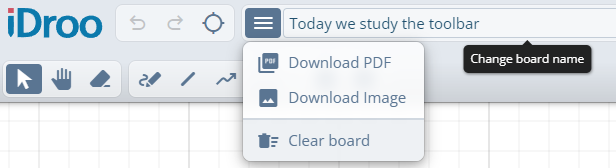
- Board menu: Access options such as Download PDF, Download image, and Clear board to manage your board's export and reset actions.
- Board name: Click on the board title to rename it, making it easy to personalize or identify your project.
Drawing and sketching tools

- P Pointer: Select and move objects on the board. Use this tool to adjust your elements as needed.
- M Hand: Pan across the whiteboard to navigate larger areas without accidentally modifying any elements.
- E Eraser: Remove unwanted lines, shapes, or text.
- F Pen: Draw freely as if using a pen on paper. Ideal for brainstorming, annotating, or sketching concepts.
- L Line: Create straight lines, perfect for making diagrams or connecting points.
- A Compass: Plot precise arcs by placing the center first, then dragging the radius plus start and end handles. Great for compass-style geometry.
- K Polyline: Connect straight segments in sequence to outline flows, highlight paths, or create angular shapes.
- B Curve: Draw smooth lines that bend through each point—great for organic shapes or softer connectors.
- J Connector: Draw lines that snap to shapes, useful for building flowcharts or visual diagrams.
- O Shapes: Insert shapes like rectangles, circles, polygons, or other geometric shapes to create diagrams or illustrations. Click and drag to draw.
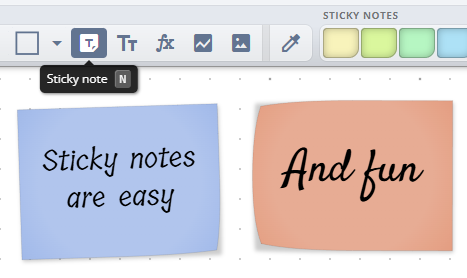
- N Sticky note: Drop a color-coded note anywhere on the board. Click once to place it and immediately start typing to capture ideas, assign tasks, or collect feedback.
- T Text: Add text anywhere on the whiteboard to label or explain your ideas. Adjust font, size, color, and alignment to suit your layout.
- G Formula/Equation: Insert mathematical expressions or complex equations with ease.
- H Graph: Plot coordinate grids to visualise equations or functions.
- I Images and documents: Upload images or documents to support your ideas or provide additional context.
Collaboration and additional tools

- Participants List: View participants in the current whiteboard session. Manage access or see who’s actively collaborating.
- Chat: Open the chat to communicate with collaborators in real time.
- Sharing: Share your whiteboard with others via a shareable link. Manage user permissions and control who has access.
- Board Settings: Change board background style.
- Help Center: Access help documentation or tutorials to guide you through using iDroo more effectively.
- Keyboard Shortcuts: Press F1 to toggle the shortcuts panel and view all available shortcuts.
- Language Switch: Change the interface language to suit your preference.
- Profile picture - User menu: Access your user profile, preferences, or log out.
Sticky notes palette
Click the Sticky notes icon to expand the quick palette. Pick a color to arm the tool, then click anywhere on the canvas to place a note and begin typing instantly.
Use the color row to switch between presets without opening additional menus. If you need more space for longer text, drag a note from any corner to resize it while keeping the sticky note styling intact.
Style options

S Style picker: The style picker allows you to copy the style of any selected object. Click on an object to quickly replicate its appearance onto other elements, maintaining consistency across your whiteboard.
Stroke style: Customize the color, width, and pattern of the lines you draw. Whether you prefer solid, dashed, or dotted lines, you can adjust the stroke style to suit the specific look you're aiming for in your diagrams or drawings.
Fill style: Adjust the fill color of your shapes to differentiate or highlight sections. This is especially useful for creating visually distinct areas within your whiteboard, ensuring that key elements stand out.
Text style: Modify the color, size, and font of your text to ensure that your messages are clear. Choose from various fonts and sizes to match the style of your project or presentation. You can also choose whether the text is aligned to the left, center or right.
Formula style: When working with formulas, adjust the text color.
Floating toolbar
When you select one or more objects with the Pointer tool, iDroo can show a floating toolbar next to the selection. This keeps the most useful editing controls close to the content you are working on.
Depending on what you selected, the floating toolbar can include:
- Stroke and fill controls: Change line color, width, dash pattern, and shape fills without returning to the main toolbar.
- Text, formula, graph, and image options: Open the formatting tools that match the selected object type. Formula selections can also reveal an extra row of insert buttons.
- Quick access to more actions: Use the menu button at the end of the toolbar to open the full context menu for arranging, grouping, locking, exporting, and other selection actions.
If you prefer the classic layout, disable the floating toolbar from the top toolbar toggle or use the close button on the floating toolbar itself.
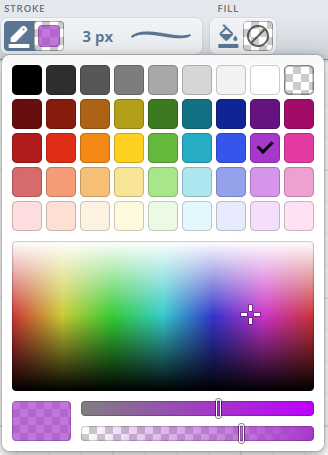
Color picker
The color picker provides a wide range of colors to customize your strokes, fills, and text elements:
- Preset colors: The top section offers a grid of preset colors, making it quick to select common shades for your designs. The top right option (shown as a checkered pattern) represents a fully transparent color, which allows you to disable the stroke or fill of an object entirely.
- Custom color selection: Use the gradient panel below the presets to select any color hue and shade. Click or drag your cursor to find the exact color you need.
- Transparency: Adjust the transparency of your color using the bottom slider. This allows for creating semi-transparent fills or strokes, which is useful for layering elements.
- Saturation: The saturation slider, located above the transparency slider, lets you adjust the intensity of your chosen color. Moving it to the left will make the color appear more muted, while moving it to the right will make the color more vibrant.
Here are some tips to make using the color picker even more efficient:
- Double-click to select and close: You can double-click on any color to select it and automatically close the color picker, saving you an extra step.
- One-click color selection: For a quicker selection, click and drag from the color button on the toolbar and release on your desired color in the picker. This action will also close the color picker immediately, allowing you to continue working without interruption.
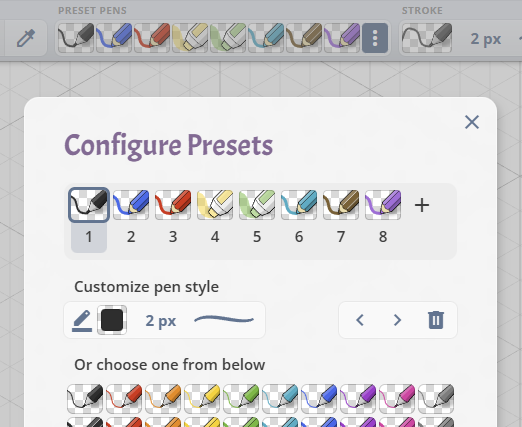
Style presets
Save combinations of stroke and fill settings so you can reapply them without reopening menus.
- Use the style preset row in the toolbar to restyle selections in one click. Any new shapes or connectors you draw will follow the active preset until you change it.
- Open Configure presets from the three-dot button to add, reorder, or remove presets. Each slot stores stroke color, opacity, pattern, and width plus fill color and opacity.
- Start from the built-in palette or tweak the color pickers and sliders to create your own presets.