The drawing tools on the iDroo whiteboard allow you to create, illustrate, and annotate ideas seamlessly. Each tool is designed to cater to different needs, from freehand drawing to structured diagrams. Learn how to utilize each tool effectively below.
Drawing Tools
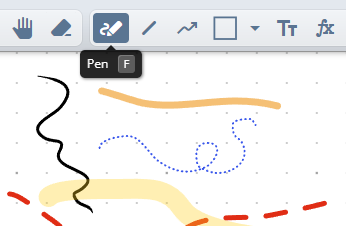
Pen tool (Freehand)
The pen tool, often referred to as the Freehand tool, allows you to draw or write freely on the whiteboard, just as you would with a pen on paper. It's ideal for handwriting, sketching, brainstorming, or adding annotations.
To activate the pen tool, press the F key or select it from the toolbar. Begin drawing directly on the whiteboard. You can adjust the pen's color and thickness using the available settings.
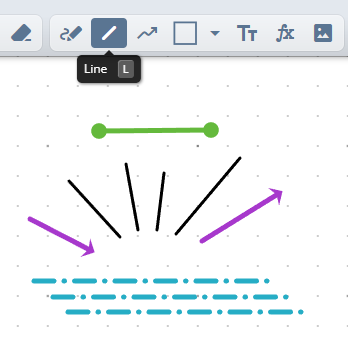
Line tool
The line tool enables you to create straight lines, making it perfect for diagrams, flowcharts, or connecting different points on the whiteboard. The tool offers flexibility to draw lines in any direction.
To activate the line tool, press the L key or select it from the toolbar. Click and drag on the whiteboard to draw your line. Hold down the Shift key while dragging to snap the line to perfectly vertical, horizontal, or diagonal angles. When snapping is enabled, line endpoints can easily align with other objects on the whiteboard, making precise adjustments simple.
You can customize the line's color, thickness, and style (solid, dashed, etc.) through the settings. Additionally, the line tool offers customization for the line ending styles on both ends. You can choose from two arrow styles, a circle, a square, or leave it as the default style with no ending cap.
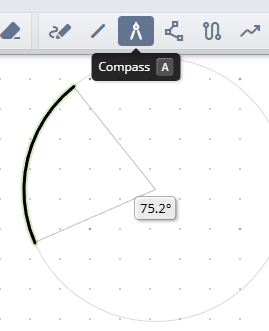
Compass tool
Use the Compass tool when you need compass-precise curves. Press A or pick the Arc button, then place three handles in order:
- Click once to set the center point.
- Drag out the radius handle to establish how far the curve extends.
- Move the start and end handles to define the sweep of the arc.
Hold Shift to snap the sweep to tidy 15° increments. The Arc toolbar toggle turns the radii lines on or off. Stroke settings still apply for color, width, and dash pattern so every arc matches the rest of your drawing.
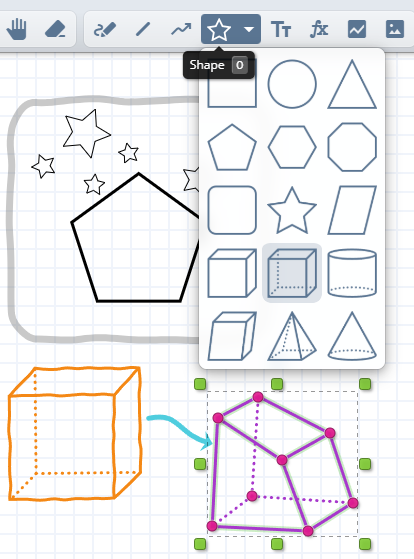
Shapes tool
The shapes tool lets you insert geometric shapes such as rectangles, circles, polygons, and more complex figures. This tool is ideal for structured diagrams, flowcharts, or adding visual elements to your whiteboard.
Press the O key or select the shapes tool from the toolbar to activate it. Choose your desired shape from the drop-down menu on the shape tool button, then click and drag to draw it on the whiteboard. If you hold down the Shift key while drawing, it will create a perfect shape with equal sides (e.g., a square instead of a rectangle, a circle instead of an ellipse).
Shapes expand from a corner by default so you can drag them out like a bounding box. Hold Ctrl while dragging to use the center as the origin when you need to position the shape around a fixed point.
You can adjust the shape's fill color, border color, and thickness using the customization options.
The shapes tool also offers a wavy line style, which gives your shapes a hand-drawn appearance for a more informal, creative look.
Once drawn, you can resize or rotate shapes as needed. Additionally, each shape's points can be moved individually, allowing you to create unique and custom shapes.
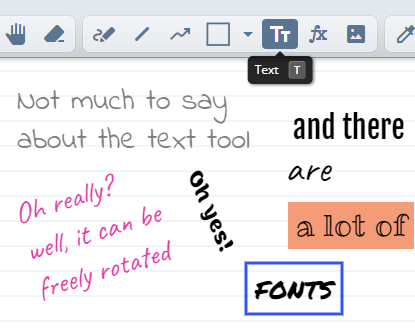
Text tool
The text tool allows you to add text anywhere on the whiteboard, making it easy to label, explain, or provide context to your ideas. You can customize your text with various formatting options.
To use the text tool, press the T key or select it from the toolbar. Click on the whiteboard where you want your text to appear and start typing. You can change the font, text size, and text color. Additionally, the text can have a border (using the same options available for stroke tools) and a background color for added emphasis.
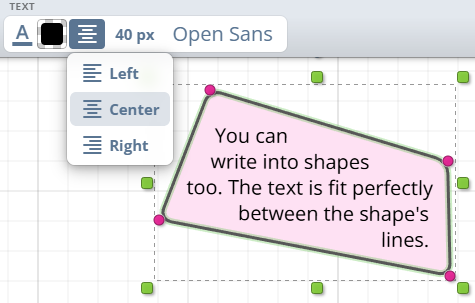
Text in shapes
You can also add text to the shapes. Double-click on a shape to start writing. Alternatively you can click on a shape with the text tool to enable text edit mode.
The text is fit nicely between the lines of the shape. Text may be scaled down if it wouldn't otherwise fit into the shape.
As shown on the image, you can also select between different text alignment options.