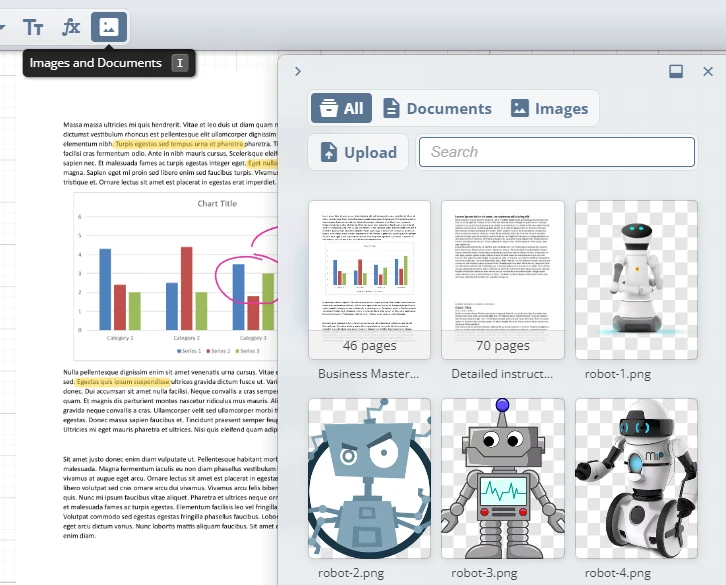
The Images and Documents feature allows you to insert and manage various types of media files on your whiteboard. This is helpful for adding visual aids, reference documents, or any other resources that support your content.
Images and Documents
Accessing the Files Panel
To open the Files Panel, click the Image icon located on the toolbar or press the I shortcut key. This opens a sidebar where you can view and manage all available media files.
Use the tabs within the Files Panel to toggle between viewing All, Documents, or Images. This helps in easily locating the file type you need.
If you have many files, use the Search bar at the top of the Files Panel to quickly find a specific document or image by name.
To close the Files Panel, click the X button in the top-right corner.
You can also move the Files Panel either to the bottom of the screen or the right side, based on your preference. The panel's position is saved for future sessions.

Uploading new files
Click the Upload button within the Files Panel to add new images or documents from your device. You can upload various formats, such as PNG and JPEG for images, and PDF or DOCX for documents.
Once uploaded, your files will be available in the Files Panel for easy insertion into the whiteboard.
Note: There may be storage limits based on your plan. Monitor your usage to avoid reaching these limits.
Inserting files into the whiteboard
To add an image or document to your whiteboard, simply click on the desired file from the Files Panel. The selected file will be inserted into the whiteboard, where you can move, resize, and rotate it as needed.
If a document contains multiple pages, clicking on it will open a new panel displaying all the pages. You can select the specific page you want to insert. Close this panel to return to the main Files Panel view.
You can also drag and drop files directly from the Files Panel onto your whiteboard.
In addition, you can drag files from your file manager directly onto the board or paste an image or screenshot using Ctrl + V (Windows) or Cmd + V (Mac).
Feature availability and limitations
The Images and Documents functionality is available only to users on higher-tier plans. Users on these plans can access the full range of features, including the ability to upload and manage files within the Files Panel.
Other users who are collaborating on a whiteboard owned by a higher-tier plan user can still upload images directly to the board but won’t have access to the Files Panel.
Be mindful of storage limits associated with your plan. If you exceed your storage capacity, you may need to delete existing files to free up space or upgrade your plan for additional storage.
Deleting files from storage
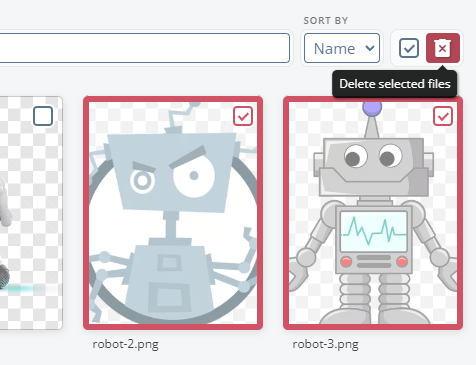
To delete files, you must be in the Dashboard view. File deletion is not available directly from the Files panel on the board.
Follow these steps to delete one or more files:
- Go to the Dashboard.
- In the files list, locate the files you want to delete.
- To select files, check the box in the top-right corner of each file card. You can select multiple files at once.
- Once your files are selected, click the Trash icon in the toolbar above the files list to delete them.
Note: This action is permanent, and deleted files cannot be recovered.
